 If you are just starting out with email marketing or marketing automation, learning digital marketing jargon can take a little bit.
In a lot of cases, you’ll learn that you need a Lead Magnet sent to a subscriber after they Opt-In on your landing page (or is it a squeeze page?).
And after a subscriber opts-in to your email list you’re supposed to send a lead magnet and multiple email messages. In theory, this all makes sense.
But, when you think about how to connect the different parts of a marketing funnel it gets complicated. Especially if this is all new to you.
In this post we’ll cover the following topics:
- why you shouldn’t attach lead magnets in an email
- where to host your lead magnet
- how create a workflow in Drip that will send your lead magnet
- Bonus: additional workflow that could be created
A little side note…in this guide we won’t cover how to setup a form in Drip. If you need help setting up an opt-in form with Drip you can check out this post.
Why Not To Include Attachments In Your Emails
First, let’s start out with why you shouldn’t send an attachment in your email. In some cases, it seems like a good idea to send an automated response and have an attachment with it.
But don’t, even though it seems easy to do.
Here’s why…
Reason 1 – Some people can’t receive attachments in emails. Many businesses have policies that automatically send emails with attachments to junk mail.
Reason 2 – Opening an attachment can be scary to some people when they aren’t expecting. But you’re thinking, “they just signed-up, they should be expecting it!” I agree, but people are busy and often forget that they signed up an your email list.
Reason 3 – When a lead magnet is accessible via a link in an email it makes it easier for you to track performance. For instance, you could have two different versions of the text link to see which is clicked more often.
Reason 4 – Not all lead magnets are small files that can be attached and sent easily. Some lead magnets are video courses, or large PDF files.
Where To Host Your Lead Magnet
host
hōst/ noun
- a person who receives or entertains other people as guests.
If this is all new to you, the best way to think of a “host” or “hosting” for your lead magnet is like a person that hosts a guest in her home.
Your lead magnet is a file that needs a place to live on the internet (not attached in your email). If it is accessible on the internet, in a lot of cases you can see when a subscriber accesses the file through the emails you send.
Another benefit is that you can give subscribers lead scoring points based on whether they open an email and click a link. Or, whether or not they just open an email.
It could be determined (based on your criteria) that a subscriber who opens and clicks a link may be ready to receive more information from you, which can ultimately lead to more sales.
But I digress, since you are probably starting to see the benefits of using a link. For extra credit reading, see creating a trigger link on Drip’s website.
Ok, back to hosting.
There are many hosts out there on the World Wide Web. Here are a few places you can host your files:
- your website
- some email marketing / marketing automation platforms
- Amazon S3, Dropbox, Google Drive, etc.
- Wistia, Vimeo, YouTube, etc
These type of hosts are where 99% percent of lead magnets will be hosted.
If you are starting out, I’d recommend you use Google Drive for any type of documents or audio files and YouTube for any video or audio files.
If you need help uploading a file to any of those places, a simple search in your favorite search engine for “upload file to [Name of Host Listed Above]” will probably return useful results.
Deliver A Lead Magnet With A Workflow Automation In Drip
In Drip you can easily send an email that contains a link to your lead magnet by using an Automation Rule. But using one of Drip’s automation workflows might be easier for you to maintain and modify down the road.
That having been said, let’s jump into setting up your workflow. When finished, it will look like the image below:
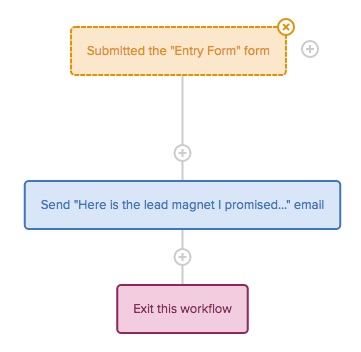 Let’s break down what this particular workflow is doing (were you expecting more? Keep reading to the bottom of this post).
Entry into an Automation Workflow
In order for a subscriber to receive your lead magnet, they have to enter the workflow. Drip offers many ways (over 25 triggers) for a subscriber to enter your workflow.
An entry trigger at its most basic level signifies what a subscriber has done or has been labeled by you.
For instance, a subscriber can submit a form or visit a certain page on your website. He can update his information, click a link in an email, or subscribe to a weekly newsletter.
Let’s try setting up your first entry point.
The first thing you will need in order to begin this automated workflow is an opt-in form. I’ve created a guide to help you setup an opt-in form in Drip in this blog post.
Once your form is set up and you’ve logged into your account, navigate to the Automations tab and click on the button in the top right to create a New Workflow.
At this point, your workflow will look like the image below.
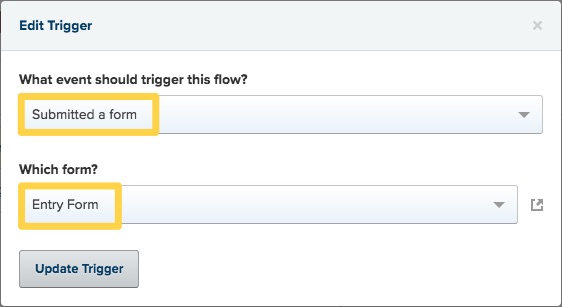
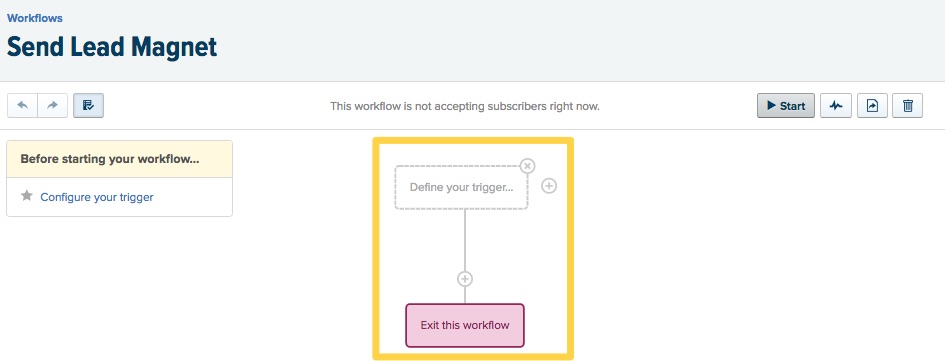 Click on the rectangle box that reads, “Define your trigger…” and then select the Submitted a form option.
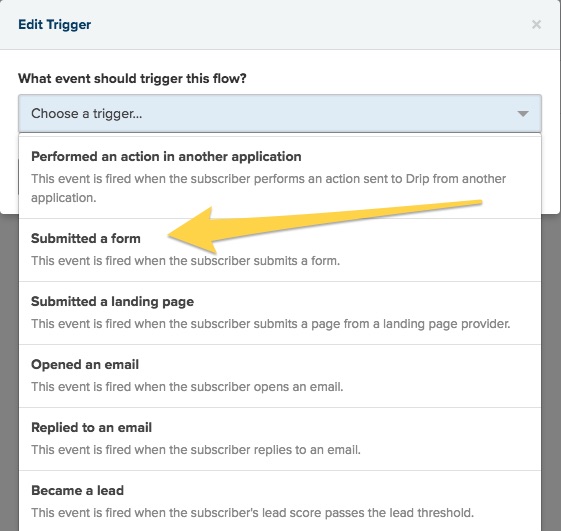 After you’ve selected Submitted a form a new prompt will appear and ask you to select a form. Choose the one that you made previously; in this example I’ve chosen a sample form I created named “Entry Form.”
 Now that the entry point is implemented, let’s move on to the action that will need to take place once a subscriber is in the workflow.
Sending The Lead Magnet
Once a subscriber has entered a workflow through an opt-in form the first thing you’ll want to do is send them the lead magnet. In more advanced workflows you may want to do some other actions (i.e., like apply a tag). But we’ll keep it basic for now.
To send an email that contains a link to your lead magnet hosted on Google Drive (or another host), you’ll first need to grab the link to the hosted file.
In Google Drive you can make the file public to anyone and then copy the link URL. Once you have the link copied to your clipboard, return to your workflow in Drip.
You’re workflow should look like this.
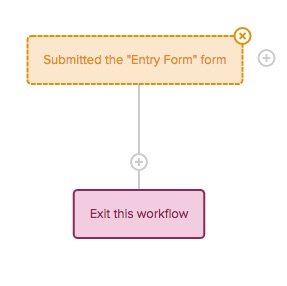 Click on the “+” between the form and the Exit this Workflow and a popup window will appear. It will give you several options, choose the Action option.
After the action step has been selected, you’ll then get the opportunity to select the preferred action. Select the action for Send one-off email.
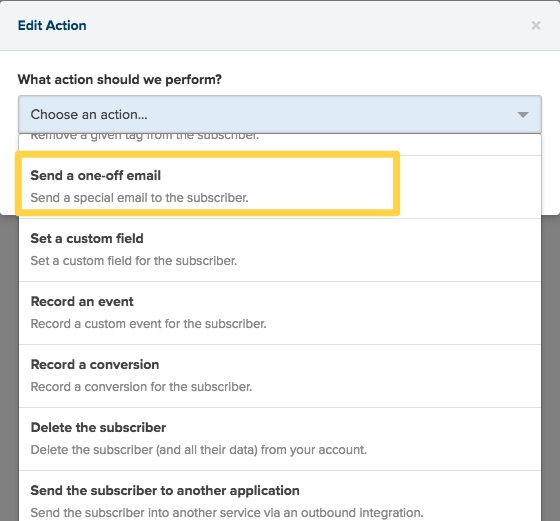 After you click on the Send one-off email setting you’ll then see the selection list collapse. Underneath there will be text that reads Edit mail settings…click it.
Enter the text of your email and change any fields as needed.
Once your text is entered and all appropriate fields are entered, create a hyperlink to your lead magnet. You’ll start this by highlighting the text that will be hyperlinked and then clicking the “link” icon on the email editor.
Once you you do, a popup window will appear that looks like the following. Paste the link you copied to your clipboard into the field for the Web Address.
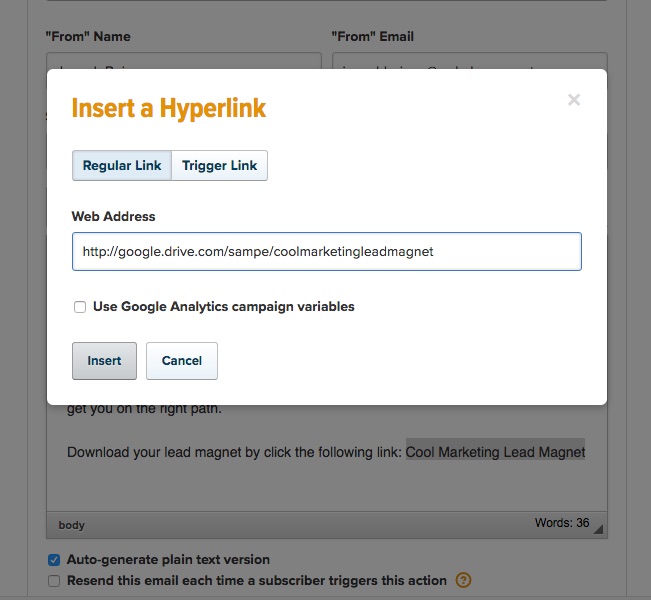 Once entered, click Insert and then save your email (image below is what you should see). I recommend sending a test email to make sure the link works properly.
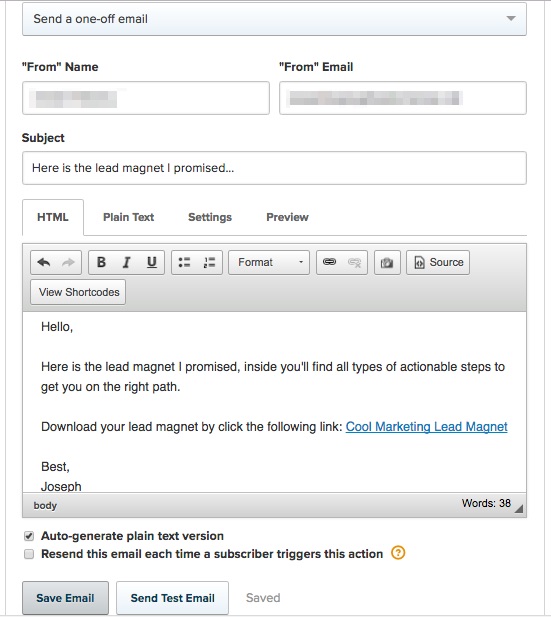 When you’re satisfied make sure to click the Update Action button and then return to your workflow. It will now look like the image below.
 Starting The Automation Workflow
At this point you are done!
Click the Start button to begin accepting subscribers into this workflow.
Want To Spice Up Your Workflow?
You’ve entered the game of workflow automation and there is much more that you *could* do.
But before doing more, consider what’s needed; not what you could do. Often, people get carried away because of their new “shiny object” and they don’t refine the most important thing: the offer.
A great offer trumps “doing cool things” any and every day.
But, if you know your offer is great, start with this simple idea to spice up your workflow (always K.I.S.S. “Keep It Super Simple”).
K.I.S.S. IDEA – Add a Tag to a subscriber before you send the lead magnet. If they open the email and click a Trigger Link send them a campaign to help get more value out of the lead magnet. See image below
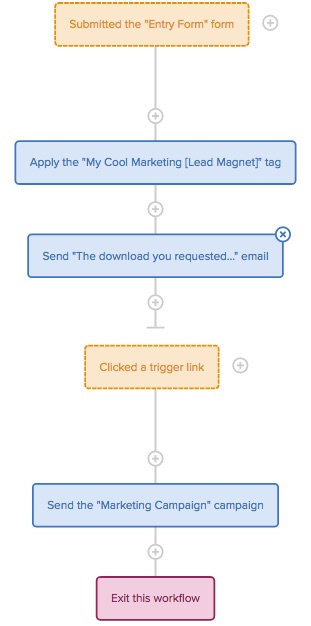 That’s it!
If you add something else to your workflow or have any ideas to add to what’s above, send me a message and let me know.
Go get it done. You have a plan, now make some progress.
